Wobble board ankle rehab
Ankle Injuries and Proprioceptive rehabilitation

Foot and ankle injuries are far too common and the need for proprioceptive ankle rehabilitation is often overlooked. As somebody who previously served in Elite British forces, proprioceptive rehab is a slightly sore point. Moving at pace, in all weather, over uneven mountainous and boggy land, carrying heavy loads puts the foot and ankle complex through its paces. Injuries are a somewhat inevitable part of any such selection process. There is no time to allow most injuries to fully resolve unless you quit or are medically re-coursed in severe injury cases. Equally, quitting was not an option if one ever wanted to attempt such a course again.
That said, the author strongly believes that some of the other common running type injuries he acquired over time could have been avoided or prevented entirely. Unfortunately, numerous health professionals were uninterested or unwilling to listen to what the author was telling them at the time. As any athlete knows, one becomes highly attuned to their body and aware of when something is not performing correctly, even if the musculoskeletal knowledge is lacking. The penny finally dropped when the author started his Chiropractic training and started on a path of developing his now detailed musculoskeletal and anatomical knowledge combined with his military experiences. His knowledge has continued to grow and expand over the past sixteen years through a combination of personal interest and physically pushing his own body. Injuries also create a number of changes to tissues, movement patterns and biotensegrity (see article on Biotensegrity and how everything is connected for more details)
Ankle injuries are far too common and virtually everybody will have experienced one with varying degrees of severity. Equally, the majority of us will think nothing of an ankle injury and it may be swollen and painful for a few days, affect how we walk for a bit and then seem completely resolved. Fortunately, or unfortunately depending on how one views it, the human body is exceptionally good at adapting, which can aid with the healing process (see article on Soft tissue repair, healing and scar tissue for details). We will naturally try to avoid pain and further injuring damaged tissues and thus find ways to move which avoid pain. Injuries and adaptations can both create changes to the force within the body, which has relevance to further or other injuries. However, there is also a further relevant variable proprioception to add to the complexity.
General Sensors
Our body consists of a wide variety of specialised sensory cells and means of communicating information throughout the body and the brain. The transmission of information occurs via nerves, chemicals (hormones), fascia etc. These specialised sensors can pick up changes in temperature, blood PH, glucose levels, hormone levels, compressive or stretching forces on tissues/structures, joint position etc. One such set of these specialised sensory cells is Proprioceptive cells, critical when dealing with weight-bearing injuries such as foot and ankle injuries.
Ever wondered why you keep getting injured?
The human body has the equivalent of a three-dimensional Global Positioning System (GPS). This system uses proprioceptive cells to tell the brain where a specific joint structure is at any given point in time. Such sensors typically allow us to move around and perform tasks without actively thinking of every tiny aspect of the process, and our bodies do it. However, injuries and even minor ones typically involve some level of tissue damage and inflammatory response. Injuries and any inflammatory response can effectively apply stretching and compressive forces to tissue structures. Damage caused during an ankle or foot injury can effectively change the foot's position, and the human body is extremely good at adapting and learning new movement patterns. One analogy is to view the sensors within the foot and ankle complex as hardware and the brain as software. At the time of an injury, the hardware may move or get slightly damaged, and then the software re-writes with the new information. In effect, the new foot and ankle complex position becomes the new "normal". Most sensors would require recalibrating after damage or a good knock, which is one way to view the proprioceptive sensors. That said, any number of the possible communication links the body uses may have changed due to injury. It is not always possible to self-treat these other possible changes with stretching, strengthening or other self-treatment methods. Any rehab work will build on whatever is going on with other affected tissues, good or bad.
Pre and Post Injury Proprioception
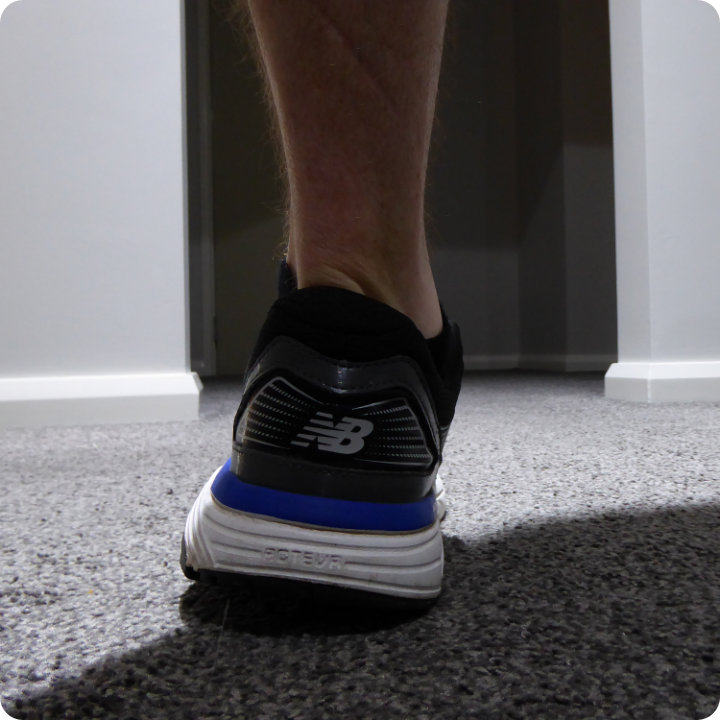
If the foot and ankle are moving differently post-injury, we are now placing differing loads on other joint structures and tissues. Such a situation explains why people with unresolved ankle injuries frequently encounter other related injuries and are more susceptible to further foot and ankle injuries. For example, the foot may plant on the floor when walking or running normally before the injury. However, after an ankle inversion injury, the foot may plant slightly more on the lateral or outer edge of the foot (over supinate). Such a change in how the foot plants on the ground underweight (load) increases the propensity for further ankle inversion injuries, with a cumulative effect each time damage occurs. One is likely to find that it is particularly easy to injure the ankle further, especially when moving over uneven ground, and if the foot is supinating more than normal. The injury risk profile increases further if one adds heavy loads to the equation, as the author knows having had at least two grade 2 injuries to the same ankle.
Image demonstrating a foot over supinating while planting
See a Musculoskeletal Professional first

Hence, it is well worth getting such injuries professionally looked at in the first instance and then addressing the joint positioning issues. The good news is that most proprioceptive rehab can be done at home and is a fairly straightforward process. That said, it is important to resolve any other underlying problems before embarking on foot and ankle proprioceptive rehabilitation (see a professional first, as it may not be safe to perform such rehab in some cases). The article on finding a good Musculoskeletal professional may prove helpful.
Foot and ankle proprioceptive training requires a level of self-discipline, and you have to put the time in and do not expect the issue to resolve without any effort. The process effectively involves moving the foot and ankle joint complex through a controlled range of motion, with increasing complexity. It is not about performing the exercises as quickly as possible. The idea is to regain fine-tuned motor control. Hence, performing the process in a slow and very controlled fashion is the name of the game. You are looking to recalibrate or fine-tune the sensors post-injury. Depending on the severity of the injury, proprioceptive rehabilitation may need performing in a non-loaded or non-weight bearing fashion before embarking on weight-bearing retraining. Hence, the author cannot stress enough how important it is to get the injury looked at by a professional before attempting to perform any rehabilitation work. You could do more harm than good.
Safety and Wobble/Balance Board use
Foot and ankle proprioceptive training is relatively easy to perform in the home and requires very little equipment. It is essential to consider safety when performing such exercises, and as previously mentioned, it is important to see a professional and get their approval before embarking on the rehabilitation. The main piece of equipment one needs is a “wobble board” or “balance board”. These are effectively circular discs with half a sphere attached to the underside. Such boards can be purchased for relatively little in most sports shops, some department stores or online. Boards are usually wood or plastic and vary in diameter and height, with some having grit on the side you stand on and a rubber pad underneath. Instructions should come with the board regarding where it is safe to use it. For example, a complete wooden board would not be very safe to use on a hard surface, like tiles, wood or laminate. It is likely to slip unless one places a suitable rubber mat or similar between the contact surfaces.
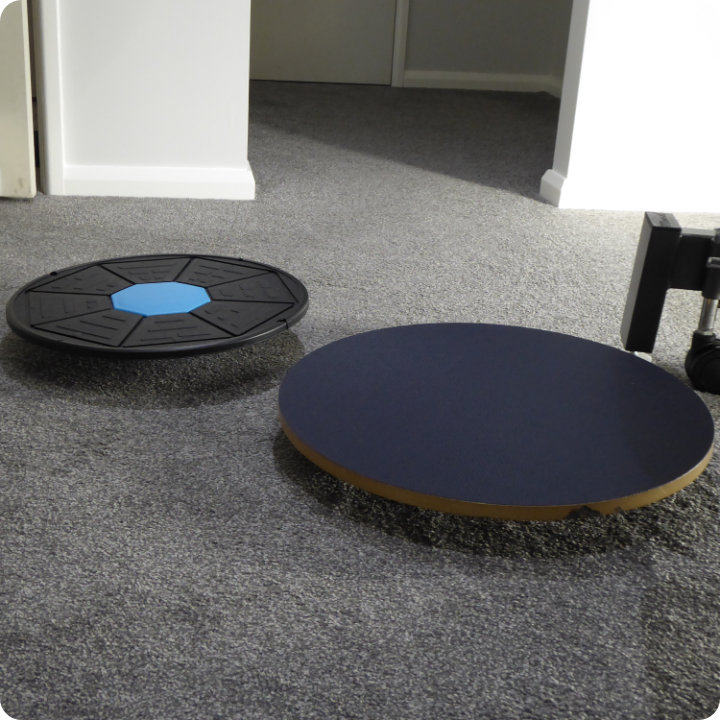

Image examples of wobble/balance boards top and bottom
It is also best to perform the rehabilitation exercises in either bare feet or socks, depending on the surface of the wobble/balance board. After all, you are looking to recalibrate the sensors, and the board offers a flat surface and helps limit additional variables. Wearing shoes while performing the rehabilitation can add many additional variables due to insoles, shoe design, age and wear patterns etc. The boards with a grit type surface can be more comfortable with socks, and those with a smooth surface can be better with bare feet or socks with rubberised grips (yoga, pilates socks).
Wobble/Balance board clock or compass
To use the wobble board effectively, one can imagine a superimposed clock face or compass on the upper side of the board. The author will use the first letter for points of the compass, followed by the clock number, e.g. North and 12 O’clock N (12) throughout this article. It is crucial to think about safety when getting onto the board while using the board and getting off it. Find a suitable area and surface for the type of wobble/balance board you have and preferably with one to two immovable objects around shoulder-width apart. These objects provide added safety/stability when getting on, off and while using the board. Examples might include a kitchen table, sofa back, work surface etc. It is possible to use suitably stable chairs or one immovable object with an appropriate chair (images show a treatment table and chair for support).

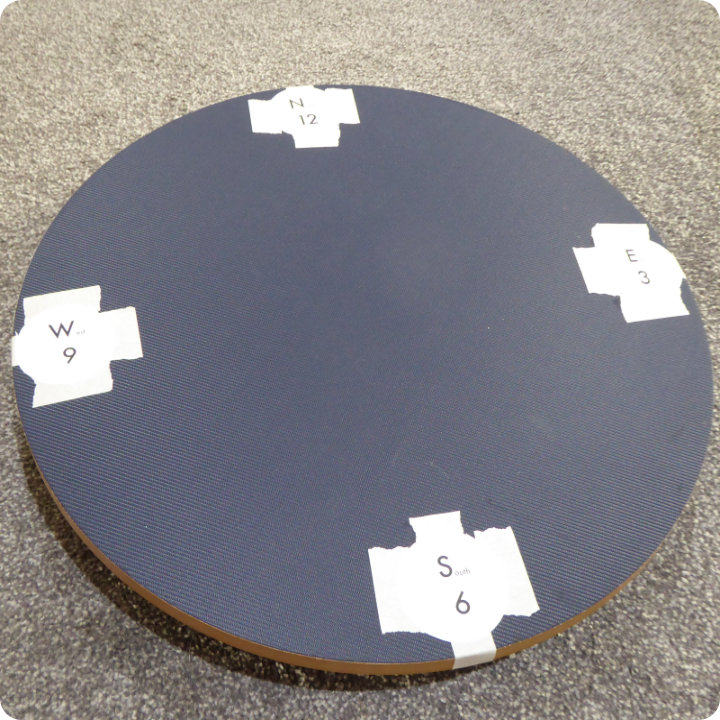
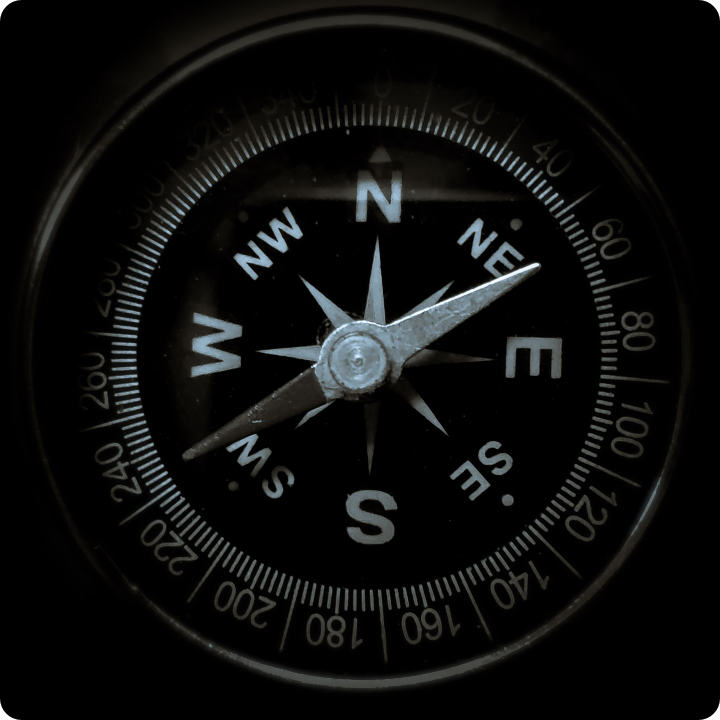
Image demonstrating Clock face, Compass and a suitably marked balance board
Getting on and off (Wobble/Balance Board use)
One should place the wobble/balance board on a suitable floor between the two immovable objects, and to mount the board, one should hold onto both objects. It is then a simple case of tipping the board to one side E (3) right foot or W (9) left foot and placing one foot on that side of the board. Then using the supports, one can then place the other foot on the other side and bring the board into a horizontal or level position. The feet should be evenly spaced apart on the board, and one can easily adjust the position with the help of the safety supports. Getting off or unmounting the board is the opposite process. Tilt the board to one side, lift the foot off that is furthest from the ground and place that on the ground, and remove the other foot. The board mounting and unmounting process changes as one progresses with the proprioceptive rehabilitation.
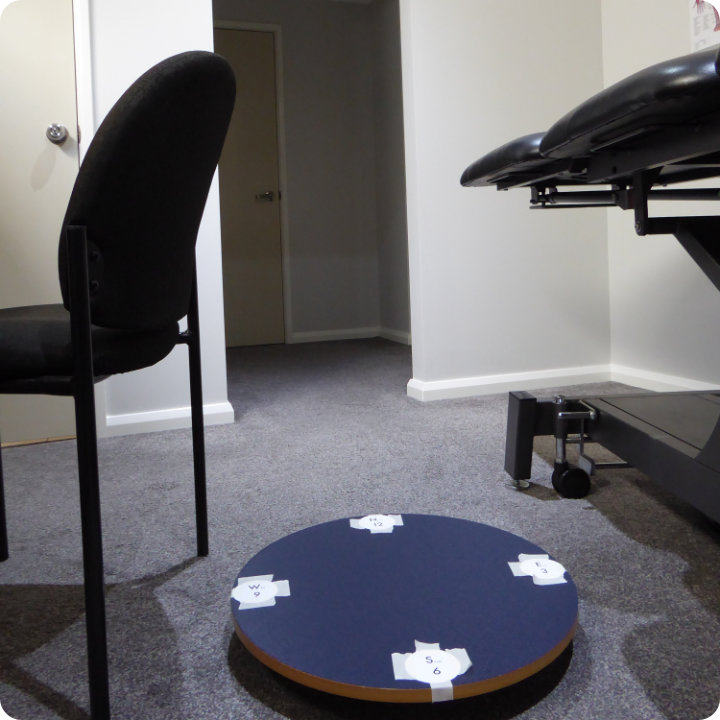


Image demonstrating balance board floor position, mounting the board and start position (two legs)
The Proprioceptive rehabilitation process
There are two core exercises use this proprioceptive rehabilitation article and these are made more challenging as one progresses, by changing one exercise variable at a time. It is important to go through the entire process and not jump ahead.
Proprioceptive rehabilitation 1
It is important to continue holding the safety supports during the first phase of these exercises, though your entire body weight should be on the board. Once on the board and in the start position (standing on the board in the horizontal position and holding the supports), the first exercise involves slowly tilting the board forward towards N (12). The idea is to slowly tilt the board forward without tilting it to either side. You are trying to get the N (12) edge of the board as close (millimetres) to the floor as possible without touching the floor and then slowly returning to the start position. One can consistently get the board's edge within a few millimetres from the floor and yet not touch the floor with work. You then need to go through the same process for S (6), E (3) and W (9). The first time you perform these motions, you may find that you are a little shaky, and it can be quite hard to keep the board level while tilting it in the direction you need to go. Feeling shaky is perfectly normal, and you can also find that your legs fatigue fairly quickly after performing these exercises for a few minutes. The exercises will be using many muscles and tissues that you may not know you had and that may not have been working properly for a sustained time. Equally, as with most exercises, muscles can ache post-exercise and a day or two later. This exercise puts your foot and ankle joint structures through a controlled range of motion. You are ready to move on to the second set of exercises once you can comfortably and consistently perform these exercises in a controlled manner (no wobbling and getting the edge of the board within a few millimetres of the floor, but not touching the floor) and without lots of aching afterwards.
Start position to North 12 and back

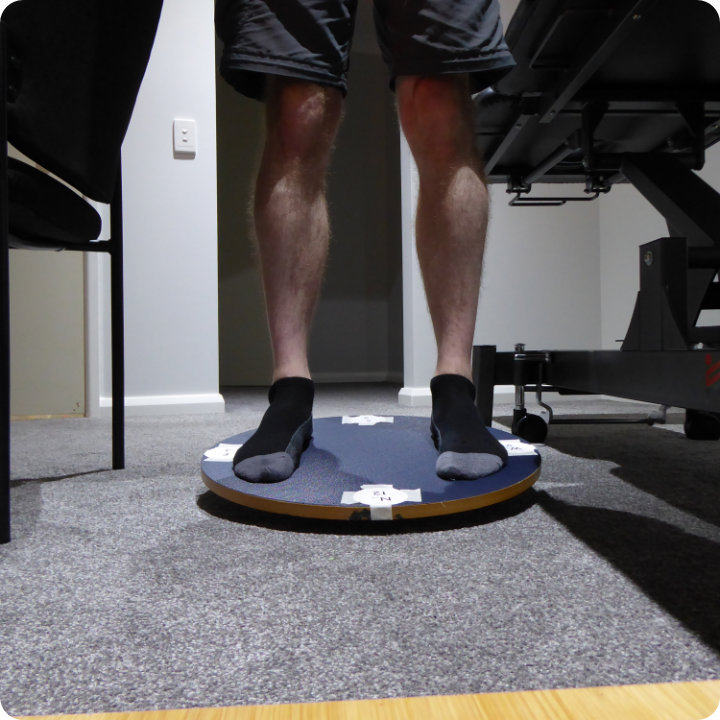
Image demonstrating 2 leg start position and tilting North (12)
Start position to South 6 and back


Image demonstrating 2 leg start position and tilting South (6)
Start position to East 3 and back

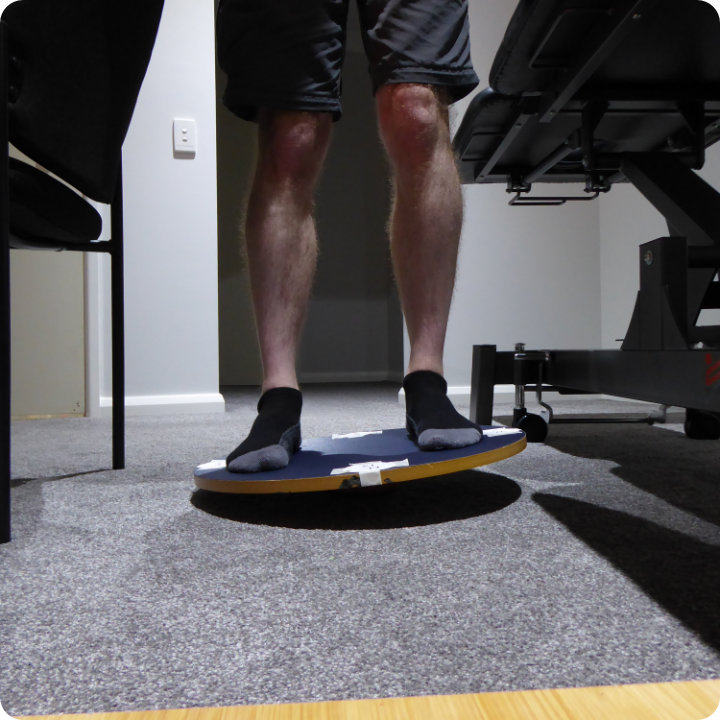
Image demonstrating 2 leg start position and tilting East (3)
Start position to West 9 and back


Image demonstrating 2 leg start position and tilting West (9)
Proprioceptive rehabilitation 2
The second proprioceptive exercise builds on the first exercise and commences from the same start position. As in the first exercise, you will tilt the board forward N (12) and bring the edge as close (millimetres) to the floor as possible without touching the floor. Once at the N (12) position, you are going to gradually tilt the board in a clockwise fashion towards E (3) and progressively move the edge of the board from N (12) to E (3). Again, the idea is to keep the board edge as close (millimetres) to the floor as possible without touching the floor. Once, at E (3), you will perform the same process to S (6), W (9) and back to N (12) and then the start position. You can then perform the process in the opposite anti-clockwise position, N (12), W (9), S (6), E (3) and back to N (12) and the start point. Keeping the board edge just off the floor as you perform this exercise can be challenging to start with, but stick it. This second exercise puts your foot and ankle complex through a greater range of motion than in the previous exercises. Again, you will be using tissues differently and may fatigue quickly or ache the day or two after as tissues adapt (see article on Soft Tissue Adaptation to activity and injury for further information). As with exercise one, you are ready to progress the difficulty level once you can consistently perform the exercises in a controlled fashion (with the board's edge within a few millimetres of the floor but not touching the floor) without aching lots afterwards.
Making the exercises more challenging
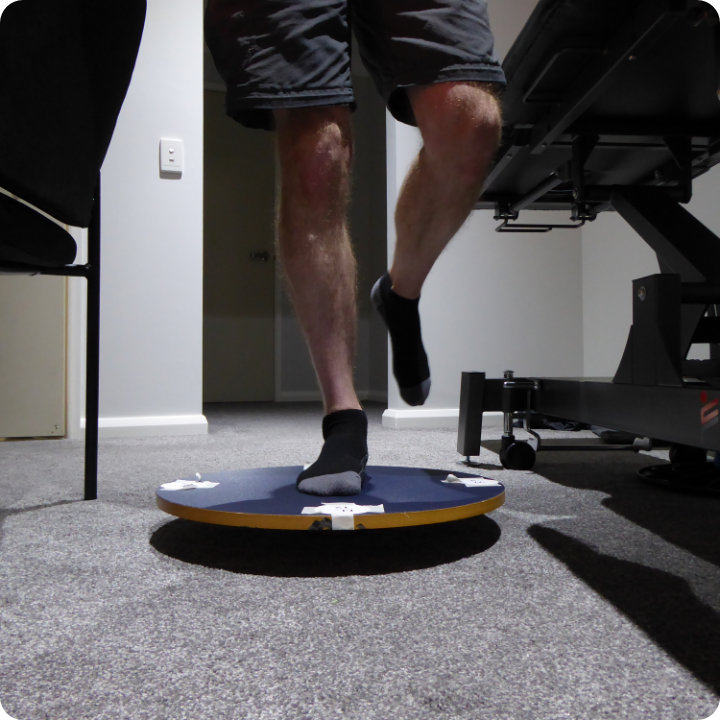
Keep the original setup (immovable objects, suitable surfaces etc.) in place for safety as the difficulty of the exercises increases. Equally, each time the exercise complexity increases, it is important not to change other variables. Hence, one will see a distinct pattern in the rehabilitation process. Each time the difficulty of the exercise increases, you will start with the Proprioceptive rehabilitation 1 exercise, followed by exercise 2.
Partial support
Partial support means that you will only be using one of the two supporting immovable objects while performing the exercises. Hence, only one hand will be used for additional support while performing the exercises. However, both supports should remain present for mounting and dismounting the board and safety if needed while performing the exercises. Once in the start position, you will go through completing exercise one and then two again once you are ready to progress to it. It is essential to only progress to the no support setup once you have met the requirements for exercise progression, as previously explained.
No support
No support means that you will not use either of the two supporting and immovable objects while performing the exercises. The supports should remain in place for safety when mounting, dismounting and completing the exercises on the board. Performing these exercises in an unsupported fashion can be quite challenging at first. You will perform exercise one from the start position and only progress to exercise two when ready.
Fully supported one leg (each leg)
There are slight differences in how you mount, dismount, and stand when using the wobble/balance board in a one-legged fashion. Continue with the original setup for safety and use the supports for mounting, dismounting and exercise performance. To mount the board, hold the supports, place one foot in the middle of the board, then step up onto the board. Dismounting is the opposite process. One should perform the exercises on each leg (foot/ankle) and not just the previously injured one. Only progress from exercise one to two and beyond in difficulty when you meet the requirements described early, which will apply to each leg now.
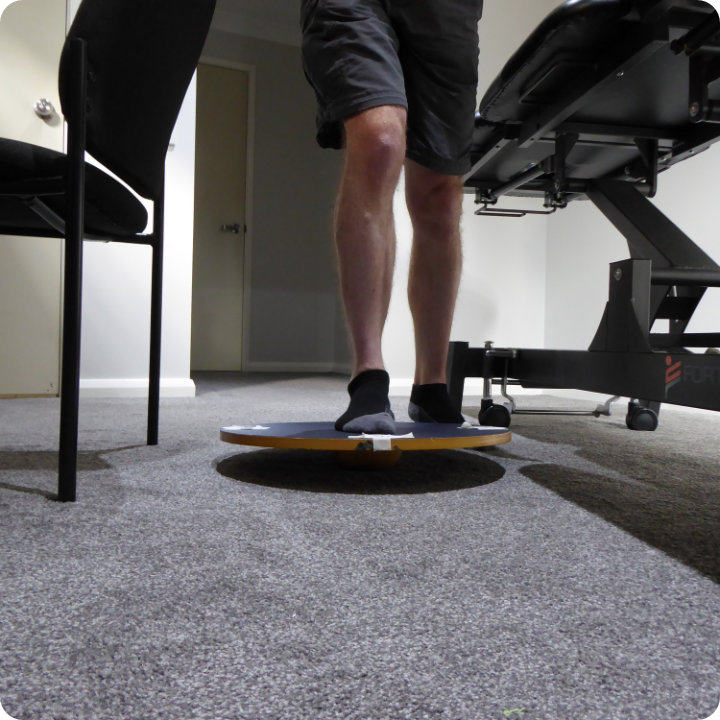

Image demonstrating 1 mounting the board and start position (One leg) use
Start position to North 12 and back

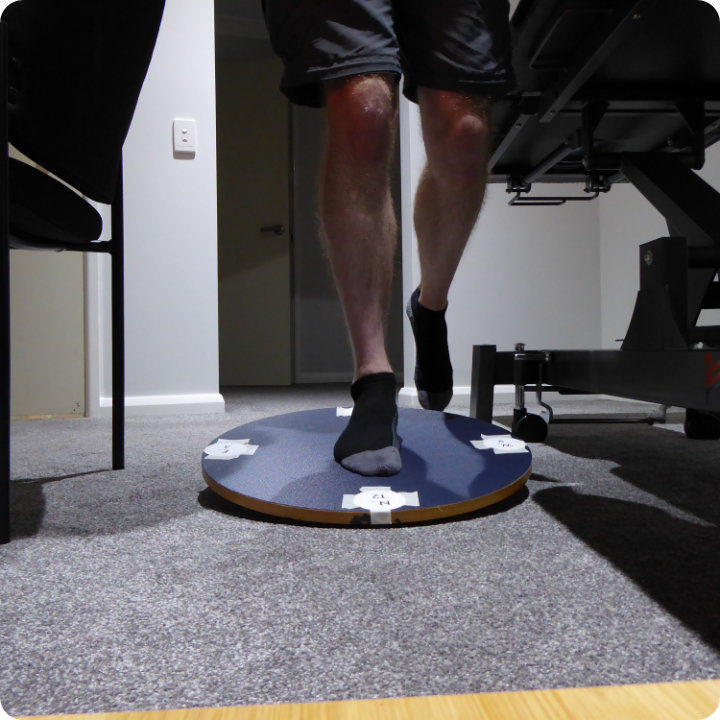
Image demonstrating 1 leg start position and tilting North (12)
Start position to South 6 and back


Image demonstrating 1 leg start position and tilting South (6)
Start position to East 3 and back

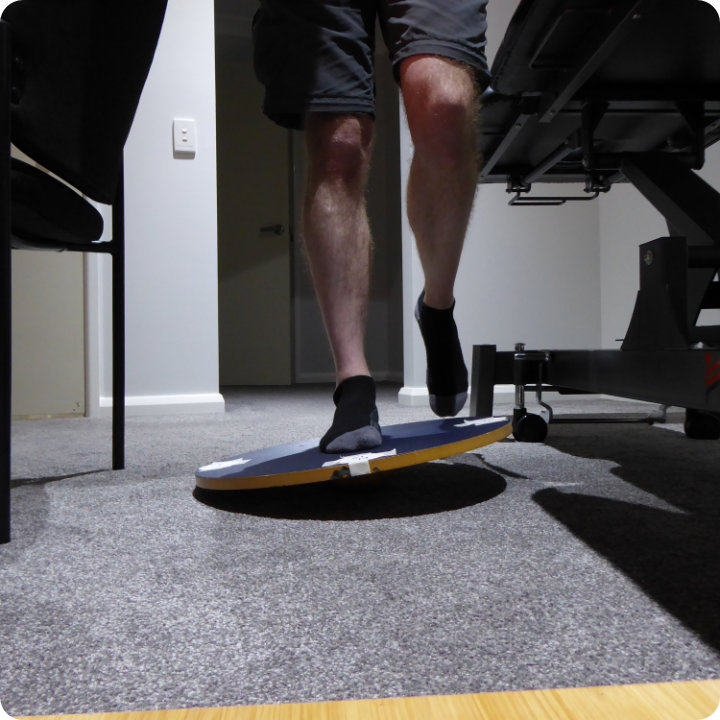
Image demonstrating 1 leg start position and tilting East (3)
Start position to West 9 and back


Image demonstrating 1 leg start position and tilting West (9)
Partial support one leg (each leg)
From the partially supported start position, perform exercise one on each leg and, when ready, progress to exercise two.
No support one leg (each leg)
One-legged and no support can prove very challenging at first, and it may take time to progress from exercise one on each leg to exercise two. It is important to put the time and effort in, and one often needs patience.
Advanced proprioceptive rehabilitation and another level

It is possible to make these exercises even more challenging, though most people may not find it hugely beneficial in doing the advanced exercises. The author has never felt the need to progress to super-advanced levels, though he has included brief details in this article. However, the details may prove helpful for individuals requiring an extremely high level of proprioceptive control, such as ballet dancers, gymnasts, martial artists, netball, basketball players etc. The same rules apply for performing the advanced proprioceptive rehabilitation exercises covering safety and exercise progression.
- Fully supported eyes closed
- Partially supported eyes closed
- No support eyes closed
- Fully supported one leg (each leg) and eyes closed
- Partially supported one leg (each leg) and eyes closed
- No support one leg (each leg) and eyes closed
The article was written by Terry Davis MChiro, BSc (Hons), Adv. Dip. Rem. Massag., Cert. WHS.
The Morningside clinic occasionally runs promotional treatment rates for new and existing patients, which are available via the online booking calendar. If you liked this article or found it interesting, feel free to share the content with others. There are lots more articles available via the TotalMSK main Health, Wellness and Sports Injury blog page, which has a brief description of all the articles to date.
About the Author
As of December 31st 2020, the author chose to leave the Chiropractic profession due to a planned move back to Australia, where his training and education are not recognised. Terry no longer works as a Chiropractor and works as a Myotherapist in Morningside, Brisbane. He developed an early interest in soft tissue therapy techniques and advanced myofascial release methods in 2006 for treating various conditions. Terry's interests in human performance and trauma have naturally led to him developing a specialism in treating work and sports-related musculoskeletal injuries and Chronic Pain symptoms.
The author possesses an unusual background for somebody who trained in the McTimoney Chiropractic technique. His education, training, and practical experience span over two decades and relate to health's physical and mental aspects. He also needed to push his body and mind to the limits of physical and psychological endurance as part of his time serving in Britain's elite military forces. His education includes a bachelor of science degree in Business Management, with a specialisation in psychology and mental health in the workplace, an Integrated Masters in Chiropractic, MChiro and a multitude of soft-tissue therapy qualifications (see the about section for more details). His soft tissue qualifications range from certificate level right through to a BTEC Level 5 Advanced Diploma in Clinical Sports and Remedial Massage Therapy. He has also taught as a senior course coach at the Advanced Diploma level (Myotherapy / Musculoskeletal Therapy) in Australia, both theoretical and practical aspects, including advanced Myofascial Release Techniques and has certification in training and assessment. Terry will have taught many of the first students to train as Myotherapists in Brisbane. Terry's combination of knowledge through education, training, elite military service, and personal injury history has paid dividends for the patients he sees and has treated over the last 16 years. Terry is still extremely active and enjoys distance running, kayaking, mountain biking and endurance-type activities.